- Forside
- Gode råd om gulv
- Gulvbelægninger
- Trægulve
- Bærende gulve
- Akustikpaneler
- Afpassede tæpper
- Bambusgulve
- Bordplader & bordben
- Designgulve
- Fliser og klinker
- BeefEater gasgrill
- Gode råd om gulv
- Gulvtæpper
- Gulvvarme
- Græstæpper
- Korkgulve
- Køkken, bad & garderobe
- Laminatgulve
- Linoleumsgulve
- Maling, Væv & Spartel
- Måtter
- Møbler & Boliginteriør
- Nålefilt og messetæpper
- Plejeprodukter
- Restpartier & gode tilbud
- Sildebensparket & Stavparket
- Tæppefliser
- Terrassebrædder
- Tilbehør
- Trægulve
- Vareprøver
- Vinylgulv
- Værktøj
- Øvrige produkter
- Loft- og vægpaneler
- Flotte gulve
- Fyrretræsgulv
- Klikgulve
- Bestilte varer
-
-26%
-
Populær29,00 DKK
-
29,00 DKK pr m2
-
Populær21,00 DKK
-
29,00 DKK pr m2
Bærende gulve
Alle informationer på denne side er kopieret materiale fra Gulvfakta som er et fagteknisk opslagsmateriale, Kilde: Gulvfakta
Ved bærende trægulve forstås gulve, som hviler på en lineær understøtning af strøer eller bjælker. Belastningen af gulvet overføres gennem brædderne til de underliggende strøer eller bjælker. Gulvbræddernes tykkelse bestemmes af den forventede belastning og afstanden mellem strøer eller bjælker.
1.7.3.1 Checkliste ved lægning
1.7.3.2 Projektering
1.7.3.3 Opstrøning - metoder
1.7.3.4 Brædde, tykkelse og materiale
1.7.3.5 Strøerne - materiale
1.7.3.6 Strøafstande
1.7.3.7 Opklodsninger
1.7.3.8 Lægninger af strøgulve
Alle informationer på denne side er kopieret materiale fra Gulvfakta som er et fagteknisk opslagsmateriale, Kilde: Gulvfakta
Hvordan opklodses strøer?
Strøer opklodses på en underliggende konstruktion af fx beton, letbeton eller træ, så der opnås et plant underlag for trægulvet.
Bjælker indgår i træbjælkelag over krybekældre og i etageadskillelser. Både strøer og træbjælkelag giver gode muligheder for at anbringe lyd- og varmeisolerende materialer i hulrummet under trægulvet. Hulrummet kan desuden benyttes til fremføring af varme- og el-installationer.
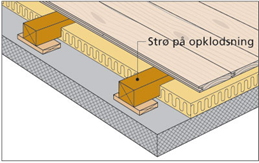 Fig. 10. Bærende gulv på strøer.
Bærende trægulve kan udføres af brædder eller langstavsparket. Brædderne kan enten være traditionelle gulvbrædder af massivt træ, eller de kan være udført som parketbrædder eller lamelbrædder. Langstave er parketstave i ekstra stor længde
1.7.3.1 Checkliste ved lægning af gulve
Checkliste ved lægning af gulve på strøer og bjælkelag:
• Den relative luftfugtighed i bygningen skal være mellem 35 og 65 %, afhængigt af årstiden, og temperaturen ca. 20°C.
• Bygningen skal være lukket, og varmeanlæg skal være installeret og i brug.
• Fugtindholdet i beton, letbeton mv. skal være i ligevægt med den for årstiden normale relative fugtighed. Afhængigt af udtørringsforholdene, kan dette tage flere måneder.
• Isoleringsmaterialer mv. skal være tørre.
• Opklodsninger udført med beton skal være hærdede og tørre.
• Fugtspærre, f.eks. i form af en 0,20 mm. polyethylenfolie, skal være udlagt inden lægningen af gulvet til beskyttelse mod opfugtning fra underliggende beton- eller letbeton-konstruktioner.
• Trægulvmaterialer skal have et fugtindhold på 8 ± 2 %, heraf bør 2/3 af partiet ligge mellem 7 og 9 % fugtindhold.
• Trægulvmaterialer tørret til brugsforholdene bør ikke pakkes ud før lægning.
1.7.3.2 Projektering
Gulve udlagt på strøer og bjælkelag skal have en styrke og stivhed, der skal være afpasset i f.h.t deres anvendelse. Nedbøjning fra belastninger som reoler o.a. må ikke være generende og rystelser som følge af almindelig gang bør ikke forekomme. Gulvet regnes normalt for at være tilstrækkeligt stift, hvis nedbøjningen ved almindelig gang på gulvet eller en statisk belastning på 750 N er mindre end 2 mm. (målt med et 2 meter retholt). Nedbøjningen måles enten midt mellem to strøfag og/eller direkte oven på en strø, mellem 2 opklodsninger. Er gulvet opklodset på de såkaldte lydbrikker, vil der være en større nedbøjning.
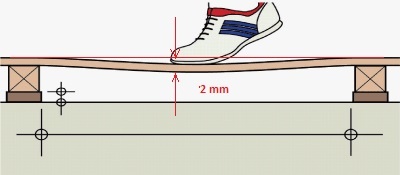
Da gulve udlagt på strøer normalt ikke regnes som en del af den bærende konstruktion (p.g.a. den lave indbygningshøjde), skal gulvene skal derfor blot overholde stivhedskravene. Bemærk dog at gulve udlagt på bjælkelag kan regnes som bærende.
Gulvbrædder der skal anvendes i bærende konstruktioner skal i h.t. EN 1991 kunne opfylde kravene om bl.a. nyttelaster se nedenstående tabel (1).
| Lastkategori | Fladelast Qk (kN/M2) | Punktlast Qk (kN) | |
| A1 | Bolig og interne adgangsveje | 1,5 | 2,0 |
| B | Kontor og let erhverv | 2,5 | 2,5 |
| C1 | Samlingsrum med bordopstilling | 2,5 | 3,0 |
| C2 | Samlingsrum med faste siddepladser | 4,0 | 3,0 |
| C3-C5 | Samlingsrum uden faste siddepladser | 5,0 | 4,0 |
| D1 | Mindre butikker | 5,0 | 7,0 |
| D2 | Større butikker | 5,0 | 4,0 |
| Adgangsveje til kategori B, C og D op til: | 5,0 | 4,0 |
(Tabel 1)
Ved projektering/dimensionering af et strøgulv er der flere forhold der skal tages i betragtning.
De vigtigste er:
• Afslutninger mod vægge og andre kanter
• Bræddernes tykkelse og materiale
• Strøernes indbyrdes afstand, materiale og tværsnitsdimension
• Afstanden mellem opklodsningerne
1.7.3.3 Opstrøning - metoder
Det er ofte langs vægge o.lign. at man som bruger oplever manglende stivhed i gulvkonstruktionen. Forklaringen skal ofte findes i den måde vi møblerer rummene på kombineret med den måde strøkonstruktionen opbygges. For at give gulvet tilstrækkelig stivhed er det nødvendigt, at man enten ilægger ekstra hjælpestrøer langs væggene i rummet eller at man, generelt i rummet, reducerer strøafstanden. I figur 1, 2 og 3 er tre metoder til lægning på støer - illustreret.
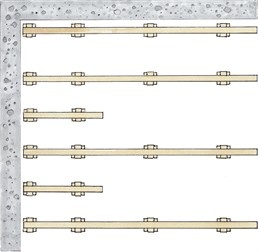 Metode 1 - Ilægning af hjælpestrøere
Fig. 1: Langs vægge parallelt med strøretningen lægges 1. strø således at afstanden til væggen en 50 - 80 mm. 2. strø lægges max 400 mm fra 1. strø. Øvrige strøer lægges med normal afstand. Ved væge vinkelret på strøretningen ilægges en kort mellemstrø.
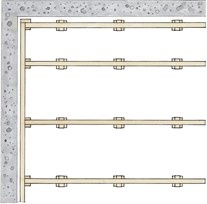 Metode 2 - Kantstrøer
Fig. 2: Som ved metode 1 reduceres afstanden mellem 1. & 2. strø til max 400 mm. Over enderne på strøerne ilægges en kantstrø der fastgøres til strøerne med skråskruning således at man får en fast og stabil ramme. Der placeres opklodsninger under samlingerne mellem hoved og kantstrø eller under kantstrøerne.
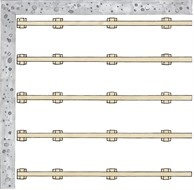 Metode 3 - Reduceret strøafstand.
Fig. 3: Denne metode anbefales til mindre rum. Strøafstanden reduceres til 70 % af den strøafstand man normalt ville have anvendt i rummet. Hvorved hjælpe og kantstrøer kan udelades.
1.7.3.4 Brædde tykkelse og materiale
Massive brædder til lægning på strøer (og bjælkelag) skal have en tykkelse på minimum 20 mm. for at den samlede gulvkonstruktion har den fornødne stivhed og styrke. Forsøg viser at styrken af gulve udført af brædder i nåletræ kan sammenlignes med styrken af parketbrædder udført i løvtræ. Løvtræ er som udgangspunkt stærkere end nåletræ, men styrken af et parketbræt udført i løvtræ svækkes som følge af de mange samlinger. Lamelbrædder til lægning på strøer skal have en tykkelse på min 22 mm. For lamelparketbrædder er tykkelsen og udformningen af bagsidefineren er meget afgørende for styrken af brættet. Bagsidefineren skal udføres i et ubrudt stykke og være min 2 mm., helst 3 mm. tyk.
1.7.3.5 Strøerne - materiale
Strøer kan udføres i massivt eller lamineret træ. Strøer i massivt træ skal være skarpkantede lægter med en bredde på mindst 45 mm. (høvlet mål). Strøer i lamineret træ (fx Kerto) skal have en bredde på mindst 40 mm., så er der ikke risiko for at de flækker. Strøerne bør leveres så lange som muligt, da det bedste resultat opnås med lægter i fuld længde. Længder på indtil 3,9 m. er normal lagervare, og større længder - op til 4,8 m. - kan normalt leveres på bestilling. Strøer bør mindst være høvlet på den side, som vender op mod gulvbrædderne.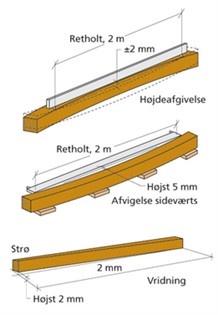 Strøer - rethed
Figur 11. Tolerancer på strøer.
Strøerne skal være så rette, at deres overflade efter udlægning højst afviger ± 2 mm. på et 2 m. retholt. Efter udlægning bør der højst være afvigelser sideværts på 5 mm. fra rethed på 2 m. (afvigelse fra retholt, der anbringes på den hule side af strøen). Strøerne må ikke vride mere end, at de ved løs udlægning med den ene ende fastholdt mod gulvet højst "gaber" 2 mm. per 2 m. strølængde ved et hjørne i modsatte strøende. For en strø på fx 3,9 m. svarer det til, at vridningen højst medfører et "gab" på ca. 4 mm.
Strøerne skal være af en kvalitet, så krav til knaster svarer til sorteringsreglerne for DK 18. Dette betyder, at enkeltknaster højst må udgøre 1/3 x tværsnitsarealet og knastgrupper højst 1/2 x tværsnitsarealet. Det bedste resultat opnås, hvis fugtindholdet af strøerne ved lægningen svarer til bræddernes. Dette reducerer bl.a. problemer med at det knirker. Fugtindholdet i strøerne må ved lægning aldrig være over 12 %. Dette betyder, at gennemsnittet af de målinger, der foretages, højst må være 12 %, og at der normalt ikke bør forekomme enkeltresultater højere end 14 %.
1.7.3.6 Strøafstande
Erfaringsmæssigt vil man få en tilfredsstillende stivhed ved at anvende de i tabel 2 ("Strø og opklodsningsafstande") angivne normalafstande mellem strøerne under forudsætning af at man anvender af lægningsmetode 1 og 2, beskrevet under "Opstrøning - metoder".
Anvendes metode 3 skal ALLE afstande reduceres til 70% af normalafstanden.
Tabel 2: Strø- og opklodsningsafstande
| Belastningsklasse | A1 | B | C1,C2 | C3-C5 |
| Type | Bolig |
Kontor | Samlingsrum med faste siddepladser | Samlingsrum uden faste siddepladser |
| Punktlast | 2 kN | 2,5 kN | 3,0 kN | 4,0 kN |
| Strøafstand ved forskellige bræddetykkelser | ||||
| Bræddetykkelse = 20 mm. | 520 | - | - | - |
| Bræddetykkelse = 22 mm. | 600 | 530 | - | - |
| Bræddetykkelse = 25 mm. | 720 | 640 | 590 | 510 |
| Bræddetykkelse = 28 mm. | 850 | 760 | 700 | 600 |
| Bræddetykkelse = 30 mm. | 950 | 850 | 770 | 670 |
| 22 mm. Lamelparket med 3 mm. undersidefiner | 500 | 450 | - | - |
| 22 mm. Lamelparket med 2 mm. undersidefiner | 460 | 320 | - | - |
| Opklodsningsafstand ved forskellige strødimensioner og strøtyper | ||||
| Savskåret nåletræ i dimension 38 X 56 mm. | 550 | - | - | - |
| Savskåret nåletræ i dimension 38 X 73 mm. | 600 | 560 | - | - |
| Savskåret nåletræ i dimension 45 x 45 mm. | 600 | 560 | - | - |
| Savskåret nåletræ i dimension 45 x 70 mm. | 700 | 650 | 610 | 550 |
| Savskåret nåletræ i dimension 70 x 45 mm. | 930 | 870 | 820 | 740 |
| Savskåret nåletræ i dimension 70 x 70 mm. | 1080 | 1000 | 950 | 860 |
| Savskåret nåletræ i dimension 95 x 45 mm. | 1270 | 1180 | 1110 | 1010 |
| Lamineret træ dimension 39 x 40 mm. | 530 | 490 | 460 | - |
| Lamineret træ dimension 63 x 40 mm. | 850 | 790 | 740 | 670 |
| Lamineret træ dimension 75 x 40 mm. | 1010 | 940 | 880 | 800 |
For anvisningerne i ovenstående tabel er forudsat:
For nåletræ og løvtræ uden endenot:
• At stød/endesamlinger i gulvbrædder af nåletræ er placeret oven på strøer eller bjælker (ingen flyverstød)
• At højst, hver 3. nåletræsbræt stødes/samles oven på samme strø/bjælke d.v.s. at der er min. 2 brædder i mellem 2 endesamlinger på samme strø/bjælke.
• At brættet spænder over min. 2 fag
For løvtræ og nåletræ med endenot:
• At flyvestød højst findes for hvert 3. bræt indenfor samme fag d.v.s. at der er min. 2 brædder i mellem 2 endesamlinger i samme fag.
• At flyvestød i samme brædderække ikke forekommer i to nabofag.
• At flyvestød ikke forekommer i første og sidste række
• At endesamlinger limes i fer og not
De angivne afstande sikrer et rimeligt stift gulv, der ikke giver generende rystelser ved gang eller medfører, at møbler og inventar får generende hældninger på grund af gulvets nedbøjninger. Understøtningsafstanden er afhængig af den valgte materialetykkelse og den forventede belastning.
Bjælkelag der benyttes som underlag for bærende trægulve skal være afrettede til plan flade eller oprettet ved påforing ovenpå eller på siden af bjælker. Fugtindhold i bjælkerne må derfor højst være 13 %. Dette betyder, at gennemsnittet af de målinger, der foretages, højst må være 13 %, og at der normalt ikke bør forekomme enkeltresultater højere end 15 %. Anvisningerne i tabel 2 er også gældende for bjælkelag.
1.7.3.7 Opklodsninger
Strøerne oprettes til plan flade ved brug af diverse opklodsninger. Opklodsningernes indbyrdes afstand fremgår af tabel 2 under afsnittet omkring strøafstande.
Opklodsninger til strøer kan udføres af:
• Krydsfiner, mindst 100 cm², fx 100 x 100 mm. eller 80 x 125 mm.
• Spånplade, mindst 100 cm², fx 100 x 100 mm. eller 80 x 125 mm.
• Hård træfiberplade, mindst 100 cm², fx 100 x 100 mm. eller 80 x 125 mm.
• Plastkiler.
Ved højere understøtninger kan der f.eks. anvendes specielle plastkiler eller et underlag af mursten eller beton, hvorpå den endelige opklodsning placeres.
Plastkiler til opklodsninger skal have dokumentation for afprøvning af levetid og belastning, så der er sikkerhed for deres langtidsegenskaber. Plastkiler af ukendt kvalitet kan erfaringsmæssigt føre til sætninger i opklodsningen. Bløde brikker, kan anvendes under opklodsninger for at forbedre trinlydsdæmpningen. De fleste opklodsningssystemer kan medlevere "lydbrikker" som en integreret del af systemet. Vær opmærksom på at anvendelsen af lydbrikker vil gøre gulvet mere eftergiveligt med større nedbøjninger til følge. De større nedbøjninger ses tydeligere langs kanter og specielt i hjørner. Nedbøjningen vil afhænge af materialet af den valgte lydbrik.
Asfaltpap anvendes under opklodsninger som et robust lag, der giver ekstra sikkerhed mod mekanisk overlast af fugtspærren samtidig med, at den er fugttæt. Der kan f.eks. anvendes murepap i baner på 200 mm. bredde, der kan skæres til kvadratiske stykker på 200 x 200 mm. Asfaltpap kan anvendes som underlag for svømmende gulve som sikring mod byggefugt eller opstigende grundfugt, i kvaliteten underpap PF 2000.
1.7.3.8 Lægning af strøgulve
Forud for lægning af et strøgulv skal man kontrollerer at materialer og lokaler overholder specifikationerne, se afsnit 1.4.0.6 for yderligere informationer omkring dette. Samt beslutte hvilken opstrøningsmetode man ønsker at benytte (for yderligere beskrivelse, klik her). Lægningen af et strøgulv starter med udlægningen af strøerne. Strøerne skal være så lange som muligt og helst uden samlinger. Er samlinger nødvendige, skal der suppleres med ekstra opklodsninger og afstanden mellem opklodsningerne omkring samlingen skal reduceres med min 10%. Samlingerne skal lægges forskudt og fordeles således at der er min. to opklodsningsafstande mellem hver samling. Samlingerne kan også udføres ved anvendelse af lasker. Laskerne skal være min. 300 mm lange, udført af godt materiale f.eks. 12 mm. konstruktions-krydsfiner, se også figur 1
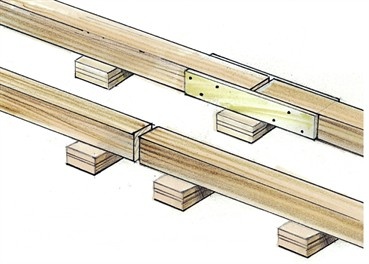 Fig. 1
Over enderne skal strøerne holde ca. 10 mm. afstand til vægge o.lign. Det kan være nødvendigt at udskære i strøen for at give plads til varmerør el.lign. I sådanne tilfælde skal der være min 10 mm. friafstand til installationen. Udskæres der i strøen skal der udføres ekstra opklodsninger. Se også figur 2.
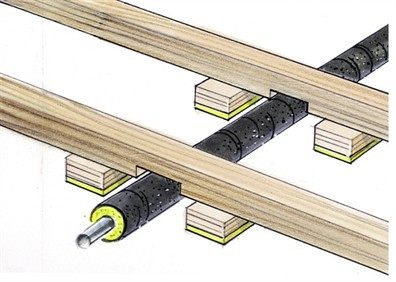 Fig. 2
Strøerne oprettes inden udlægningen af trægulvet til planflade ved justering af opklodsningshøjderne. Planheden kontrolleres ved brug af et 2 meter rethold, se også afsnittet "Planhed og gulve" for yderligere information omkring dette område. Skal en bestemt kote højde holdes kan højderne med fordel afsættes med en laser eller et væskenivelleringsapparat. Ved højdeafsætningen skal man herudover have fokus på gulvets tilslutninger til andre bygningsdele f.eks. afslutninger i døre o.lign. Skal strøgulvet gå ubrudt gennem en eller flere døre, skal der være ekstra fokus på udlægningen og opretningen af strøerne ved dørene.
Skal gulvet lægges uden forbindelse til andre rum, lægges brædderne på langs af huset. Den første række brædder lægges med notsiden mod en væg. Da væggene sjældent er tilstrækkeligt lige oprettes den første række efter en snor. Der skal holdes min 10 mm. dilatationsafstand, dette gøres lettest ved at anvende afstandsklodser eller kiler. Ved støre rum skal dilatationsafstande afstemmes med leverandøren. Gulvbrædderne fastgøres til strøerne med skruer eller søm. Det mest almindelige er at sømme eller skrue brædderne fordækt, således at sømmet/ skruen ikke kan ses. Men synlige sømning ovenfra er mulig og anbefales af flere producenter ved brede brædder (> 200 mm).

